German Shepherds Forum banner

DIY Agility Equipment-(Do it yourself ideas/hints)

1 reading
255K views 86 replies 28 participants last post by  mockingjay  
#1 ·
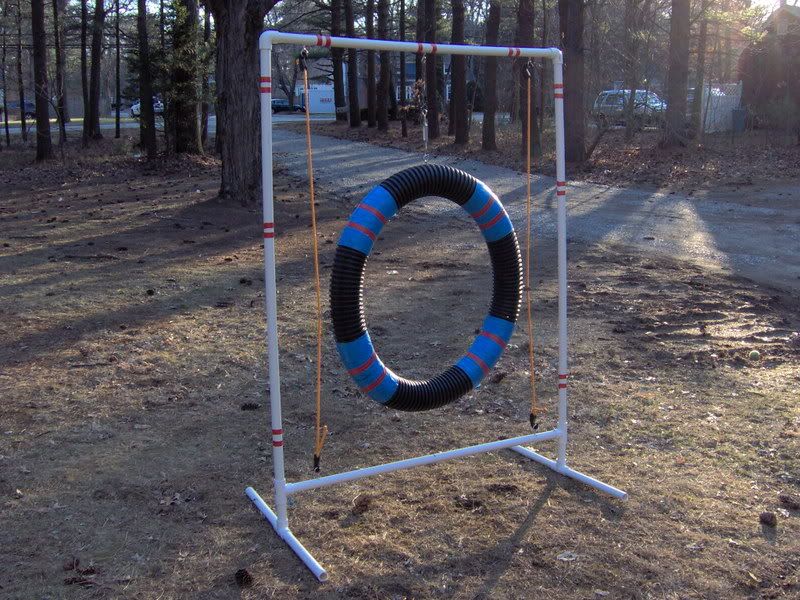
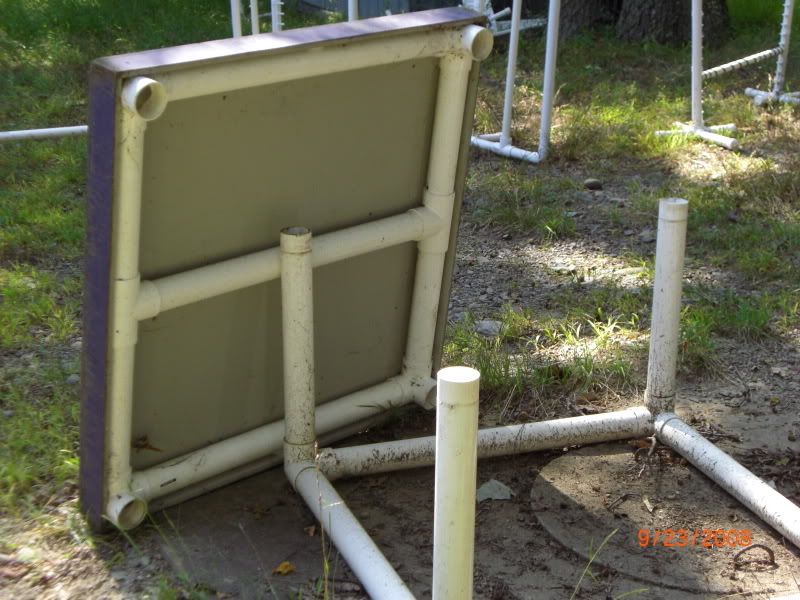
Idea from members to have an area to use as reference for making agility equipment. What I am thinking is having people to post their DIY with detailed instructions and pictures (if possible).

Think some of you have done this on some other agility posts, but if we put them here they will be easier to use as a reference.
 
#2 ·
My $20 channel weaves and PVC jumps are on my club's site (pics and downloadable instructions):

http://www.pawsitivecaninetraining.com/diy.htm

For tunnels, I use dog tunnels I got at Target for $9 each. They are quite a bit shorter than a true tunnel, but I use them to work on tunnel entries/exit and sequences in the yard. I think the brand is "Boots Barkley". The tunnels come with stakes for the ground. I'm proud to report that mine withstood a series of severe storms that knocked over 40' trees all over the city.
 
#3 ·
#4 ·
Re: DIY Agility Equipment-(Do it yourself ideas/hi

I'm the queen of salvage. My stuff wasn't formal agility but...

1. White closet pole stretched between two lawn chairs

2. Wicker mirror stand, sands mirror worked as a low jump & if I had got around to it would have held a hula hoop for a quasi tire jump

I was going to use a couple of salvage flat panel doors to make an A frame but didn't get around to it.
 
#5 ·
Re: DIY Agility Equipment-(Do it yourself ideas/hi

Originally Posted By: middleofnowhere if I had got around to it would have held a hula hoop for a quasi tire jump
I did that the other day where I had a large open space in my course in the yard and was out of equipment. I have a "real" tire that I built on the course already, but I just stuck two gardening stakes in the ground and taped the hula hoop so it was suspended between them with packaging tape. Worked really well and its still up several days later
Image
 
#6 ·
I know when I started making jumps, I thought it was all about just getting some type of upright so the crossbar could be held up for the dog to jump over.

NOW I realize that when we start building jumps, should really be making WING jumps. I've got 2 types now to show you. The first is more expensive cause bigger PVC and the fittings are the 4 way type not so readily available. I also attach the jump cups directly to the wings in this jump wing style.

Image
Image


This second setup works just as well but you can probably go to any hardware store and easily buy the fittings and put them together. Only uses 'T's' and my friend who made them chose thinner PVC (1/2 " ?). Also, she chose to make the wings as a separate piece from her regular jumps, so can just put these next to them to make a wing (or not). The jump cups are NOT a part of these wings.

Image
Image
 
#7 ·
(copied/pasted from another post..)

It would be faster for you to go to the NADAC yahoogroups page...no, crap, you'd have to be a member. I'm going to post a picture originally posted to another list by Al Ceranko (I saved it to my computer back then)--mine looks just like it except I used gray velcro ties.

Image


They are dead easy to make. I used 3/4" PVC. It takes two uprights that are 22" tall (Al's look like they might be a tad taller), one ground crossbar that is 34", and four "feet" that are 11" long. You'll need 2 four-way connectors, and to make everything look neet, 6 caps for the ends of the feet and the uprights. Then use velcro ties to fasten the hula hoop to the frame, in the middle of the crossbar and close to the top of each upright.
 
#9 ·
#10 ·
How to make a buja (wobble) board:

<u>What you Need:</u>

2 X 2 foot, 3 X 3 foot, or 4 X 4 foot square of 1/2 inch plywood (dog should be able to stand comfortably on top)
Carpet or Mat for the top (so it's not slippery)
Duct Tape
Sock
Tennis Ball

Getting started:
Image


First step, attaching the mat. Lots of duct tape!!
Image


Second step, place tennis ball inside sock. Attach to bottom of the board in the middle. You can use nails or staples. I used duct tape.
Image


Third step. . .there isn't one. You're now done! It ain't pretty, but it works.
Image
 
#11 ·
Tips for a backyard a-frame:

Quote: My very first A-frame was made from 2 doors -- hollow core! They did not last very long, so be sure and use solid core. Put 2 large hinges on the underside, and 2 eye bolts (large) on either side about 1/2 way (on the sides facing out). Now, take 2 chains, put hooks on each end and attach the chains to the eye bolts -- that holds the aframe at the height you want. Make the chains long enuf so you can make it really low for a beginner dog. Be sure and paint it with a non skid paint - or paint one coat, throw fine sand all over it, let dry, paint again.
 
#13 ·
Quote:Any ideas for do it yourself weave pole wire guides?
I no longer train with the guidewires cause now I think it's just ANOTHER thing you have to then train the dog to NOT use.... (just another step, like if you papertrain your dog in the house, and THEN train them outdoors, you just trained a step in the middle that you do NOT ultimately want).

So I just use my channel weaves and keep the channel open longer so they can use their brains to figure 'weaving' out. Instead of using the 'crutch' of the wires. BTW, I have seen dogs that seem to look more to the outside and the guidewires as they 'weave'. Then look to the inside and the POLES as they weave. So when you pull the guides it is a completely different visual picture to them like they never saw weavepoles at all!
 
#14 ·
Ok... I went out and bought out the PVC lot at Lowes today...well not really but enough to make some jumps, a ladder, and some weave poles. I am going to use the plans from Instantagility.com unless someone has some other thoughts? I am curious where you get those jump cups on your jumps MRL? I couldn't even find the pieces I need for the instructions I have, and that is just for one bar. I like that yours can hold multiple bars or be easily adjusted.
 
#15 ·
Originally Posted By: DinahmyteOk... I went out and bought out the PVC lot at Lowes today...well not really but enough to make some jumps, a ladder, and some weave poles. I am going to use the plans from Instantagility.com unless someone has some other thoughts? I am curious where you get those jump cups on your jumps MRL? I couldn't even find the pieces I need for the instructions I have, and that is just for one bar. I like that yours can hold multiple bars or be easily adjusted.
The jump cup strips and FIVE way PVC connectors are both available from the cleanrun.com site. At this point I've jerry rigged jumps and jump cups in the past and found it just not worth it. Better to get the strips/5-way PVC and then make the rest of the jump around it.

The 5-way connectors allow a wing to be easily added and I REALLY REALLY REALLY recommend some type of wing on practice jumps. Forces the handler (me?) to NOT babysit a jump and instead get myself (and my dog) used to being at a lateral distance from me and still take the jump.

Click here for jump cups

Click here for PVC connectors

These make GREAT GIFTS for those that are always having friends/family saying 'what do you want for Valentine's Day/Birthdays/Christmas!!!!!!!!!!!
 
#19 ·
More DIY agility equipment

Built a bar jump, and am currently working on a ladder walk. The jump has cups for 12", 20" and 24" in case we decided to jump at that height. I also put Tees in so I can hook wings to the jump if I want to. The jump is 48" wide and 36" tall. For the jump cups, I simply cut down a slip tee on the bandsaw, as you can see in the last pic.
 

Attachments

#21 ·
Nice!

I did the same thing this summer, but I like how you sawed off the 'T's' (is that what you did) to make the cups for the bar to sit on?

I was going to purchase the cup things from Clean Run but the shipping to Ont, Canada would kill me.
 
#23 · (Edited)
I like how you sawed off the 'T's' (is that what you did) to make the cups for the bar to sit on?
Yes, that is exactly what I did. I looked into making adjustable ones, but quite honestly- the entire idea of adjustability seems like an absolute pain to me! You have to make sure everything stays level. You have to ensure that it doesn't slip down over time- or especially if the dog hits it... No thanks. I wanted something ridged so I wouldn't have to worry about it shifting.

I also made a couple sets of collapsable 2x2 weave poles. Pics attached.
EDIT- the end pieces for the 2x2 poles are 1" slip elbows with a 1/2" thread coming off the top. I found them at Lowes. The poles themselves have a 1/2" thread to 3/4" slip adapter, and obviously 3/4" pipe.
 

Attachments

#22 ·
Here's my jump and weave pole, I now added a tire jump and a teeter. I ordered some mini equipment too (cost me an arm and a leg) but it was sent to my Dad's place 3 hours away for his dog to train on.. I will get some photo's when we visit though.

Image


Image


Image


Image
 
#24 ·
Just finished up my ladder run- turned out nice! I opted to not glue the rails in place so they could be removed at a later point if I want.
 

Attachments

#25 ·
Pause table

So we (Samba and I) searched Lowes for the 3 ways to make a table like MRL, but could not find any, so here is what we came up with:

Using just 8 elbows of 2" PVC pipe and about 30' of 2" PVC, we made an "X" type table. The center is a 4 way 2" piece. I added spacers to make changing heights easier (you can see the legs for the 24" hight next to it)

Image


Image


Image


It is adjustable for 8" (just the top and bottom) 16" (where it is set now) and 24" (for regulation for our GSDs).

The top is just 5/8th inch plywood covered with automotive grade carpeting. It's black for now, but plan on redoing it later in a lighter color - it's just what DH had on hand.

The top just sits on the "X" and it is snug without shifting. Came out to be about 37" square on the top after adding the 3" sides/lips.

Image


Image


Loving this table! :D
 
#26 ·
Achielles- very nice pause table! I tried making one out of PVC in a similar "cross" fashion as yours, though i only crossed at the bottom. I also only used 1" PVC. Yours looks very solid and nice. Since this is a "hints & tips" thread, my suggestion to you is to pick up some transparent primer. I found it at Lowes- right next to the typical purple primer. It does exactly the same thing, though it doesn't leave the purple joints. :thumbup:

BTW- your barn is *fantastic!*
 
#27 ·
Thank you for posting this! I want to start agility with my dogs ( just for fun) and was trying to get started! Sasha is on off leash training right now and then we are set for agility.
 
#28 ·
Thanks! It is VERY sturdy :) I covered the purple primer since lol decked it out on Duck tape Flames lol ;)

Oh! I love the building too! I don't own it but some great people are letting me use it. We put in very fine chat and it is perfect for jumping :)

Image

Image


I'll have to get more pictures of the building and the other equipment we've built. Love those adjustable channel weaves! ;) We'd have even more room in the building if the RV and billiard table weren't in there lol but we can't complain for the price ;) !
 
#29 ·
I spent my snow day today cutting PVC and assembling a new wing jump to add to our agility equipment. :)

Materials:
3 - 1" thick 10 foot PVC pipes (332 inches PVC total used)
4 - 1" elbow connectors
12 - 1" T connectors
8 - 1" PVC caps
Clip N Go Jump Cups (cleanrun.com)
PVC cutter

Cut PVC into following sizes:
8 x 4"
8 x 8"
6 x 30"
4 x 2"
1 x 48" (jump bar)

Assemble as in the photos:
Image


Image